Word Cloud for Job Seekers in Python


We tried Python web scraping project using scrapy and text mining project using TFIDF in past. This time, we are going to raise the bar, by combing two projects together. So we have our --- text mining web scraper. Like our early post in the CodeAStar blog, it is always good to build something useful with fewer lines of code. Then we will use our text mining web scraper to make a Word Cloud for Job Seekers.
"Cloud" funding
The cloud we go to build is a word cloud that containing key information for job seekers. Thus they can make better strategies based on what they see on the cloud.
We will use web scraping technique to get job information from indeed.com. Indeed is chosen because of its popularity, clean layout and its wide range of countries support (we will use the default US site, indeed.com, in this project). So we are going to:- Gather user's job search query
- Scrape info from indeed.com using inputs from (1)
- Use TFIDF to weight the importance of words
- Generate a word cloud using outputs from (3)
And our output should look like:
This project is straight-forward and easy. What are we waiting? Let's code it!
Code A Cloud
Now we not only code a star, we code a cloud as well :]] . Like the way we did in the EZ Weather Flask app project, we use the pipenv to start our development environment.
$pipenv --three
$pipenv shell
Get the package list file, Pipfile, from here and put it in your development folder. Then we can install all the required modules in just one line of command.
$pipenv installWe name our file as "indeedminer.py" and the file name just says it all. Inside our indeedminer file, first, we import required packages and code the "gather job search query" part.
from bs4 import BeautifulSoup from urllib.request import urlopen from urllib.parse import urlencode from tqdm import tqdm import nltk from nltk.corpus import stopwords from sklearn.feature_extraction.text import TfidfVectorizer import matplotlib.pyplot as plt from wordcloud import WordCloud import sys, re, string, datetime if (len(sys.argv) < 3): print("\n\tUsage: indeedminer.py [search keywords] [location] [optional: search page count]") print('\te.g. $pythonw indeedminer.py "HR Manager" "New York"\n') exit() search_page = 1 if (len(sys.argv) > 3): search_page = int(sys.argv[3]) search_keyword= sys.argv[1] location = sys.argv[2] params = { 'q':search_keyword, 'l':location }
The above code snippet is pretty straight-forward. We accept 3 arguments, search keywords, location and page count, from command line. Search keywords can be job title, industry or company name. And page count is the number of search result pages that we use to build our word cloud. So a usage example can be:
$pythonw indeedminer.py "property manager" "Phoenix, AZ" 3i.e. We build a word cloud for "property manager" jobs in "Phoenix, AZ" using 3 search result pages.
Please note that "pythonw" is used instead of "python" from above command. As a word cloud is a graphical component, we need to open a window terminal to display it.
Scraping with "Soup"
From our past project, we used scrapy to build a platform and use it to scrape daily deal from eBay. Since we are building an easy scraper this time, not a scraping platform, so the Beautiful Soup is the right tool for us.
url_prefix = "https://www.indeed.com" #replace url_prefix with your favorite country from https://www.indeed.com/worldwide url = url_prefix + "/jobs?"+urlencode(params) def getJobInfoLinks(url, next_page_count, url_prefix): job_links_arr = [] while True: if (next_page_count < 1): break next_page_count -= 1 html = urlopen(url) soup = BeautifulSoup(html, 'lxml') job_links_arr += getJobLinksFromIndexPage(soup) pagination = soup.find('div', {'class':'pagination'}) next_link = "" for page_link in reversed(pagination.find_all('a')): next_link_idx = page_link.get_text().find("Next") if (next_link_idx >= 0): next_link = page_link.get('href') break if (next_link == ""): break url = url_prefix+next_link return job_links_arr def getJobLinksFromIndexPage(soup): jobcards = soup.find_all('div', {'class':'jobsearch-SerpJobCard row result'}) job_links_arr = [] for jobcard in tqdm(jobcards): job_title_obj = jobcard.find('a', {'class':'turnstileLink'}) job_title_link = job_title_obj.get('href') job_links_arr.append(job_title_link) return job_links_arr current_datetime = datetime.datetime.today().strftime('%Y-%m-%d %H:%M:%S') print("Getting job links in {} page(s)...".format(search_page)) job_links_arr = getJobInfoLinks(url, search_page, url_prefix)
As mentioned above, we are using the default US indeed job searching website, you may change the url_prefix value to your favorite country using address from indeed's worldwide page. (e.g. url_prefix = "http://www.indeed.co.uk" for UK, url_prefix = "http://www.indeed.co.in" for India, etc.)
We use the 3 arguments to get one or many result pages (depending on the "result page count" parameter) from the indeed website. The result pages are a matched job list from our our inputs. Then we use Beautiful Soup to parse the result pages. Actually, we are not scraping all the content in result pages, we only scrape job detail links on each page.
Now we have an array, job_links_arr, storing all the job detail links. The next step to do is getting all the details from those links.
Before we go to get job details, we need to replace punctuation with a " " (blank) character and remove job ad meta information, like salary and job detailed location. Once those things have been done, we can use Beautiful Soup again to scape the job content.
punctuation = string.punctuation job_desc_arr=[] print("Getting job details in {} post(s)...".format(len(job_links_arr))) for job_link in tqdm(job_links_arr): job_link = url_prefix+job_link job_html = urlopen(job_link) job_soup = BeautifulSoup(job_html, 'lxml') job_desc = job_soup.find('div', {'class':'jobsearch-JobComponent-description'}) job_meta = job_desc.find('div', {'class':'jobsearch-JobMetadataHeader-item'}) #remove job meta if (job_meta is not None): job_meta.decompose() for li_tag in job_desc.findAll('li'): li_tag.insert(0, " ") #add space before an object job_desc = job_desc.get_text() job_desc = re.sub('https?:\/\/.*[\r\n]*', '', job_desc, flags=re.MULTILINE) job_desc = job_desc.translate(job_desc.maketrans(punctuation, ' ' * len(punctuation))) job_desc_arr.append(job_desc)
TFIDF the job content
We have the job content scraped from indeed.com, it is the time we do the text mining with TFIDF. On our past Avito project, we import Russian stop words to avoid counting meaningless words. So we do the same process again, but this time, we import English stop words plus common words found from job details like "may", "must", "position", etc..
try: nltk.data.find('tokenizers/punkt') #if nltk is not initialized, go download it except LookupError: nltk.download('punkt') stop_words = stopwords.words('english') extra_stop_words = ["experience", "position", "work", "please", "click", "must", "may", "required", "preferred", "type", "including", "strong", "ability", "needs", "apply", "skills", "requirements", "company", "knowledge", "job", "responsibilities", location.lower()] + location.lower().split() stop_words += extra_stop_words print("Generating Word Cloud...") tfidf_para = { "stop_words": stop_words, "analyzer": 'word', #analyzer in 'word' or 'character' "token_pattern": r'\w{1,}', #match any word with 1 and unlimited length "sublinear_tf": False, #False for smaller data size #Apply sublinear tf scaling, to reduce the range of tf with 1 + log(tf) "dtype": int, #return data type "norm": 'l2', #apply l2 normalization "smooth_idf":False, #no need to one to document frequencies to avoid zero divisions "ngram_range" : (1, 2), #the min and max size of tokenized terms "max_features": 500 #the top 500 weighted features } tfidf_vect = TfidfVectorizer(**tfidf_para) transformed_job_desc = tfidf_vect.fit_transform(job_desc_arr)
Next, we transform the job detail through TFIDF model and pick the top 500 weighted words in transformed_job_desc.
Visualize the Word Cloud
Finally, we have all required data and ready to generate a word cloud. You can modify width, height and figsize variables to adjust the word cloud's display size.
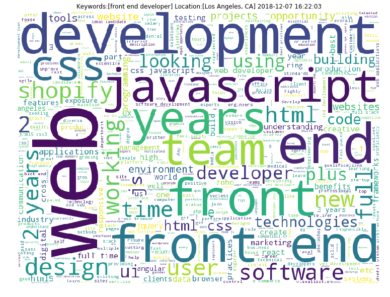
freqs_dict = dict([(word, transformed_job_desc.getcol(idx).sum()) for word, idx in tfidf_vect.vocabulary_.items()]) w = WordCloud(width=800,height=600,mode='RGBA',background_color='white',max_words=500).fit_words(freqs_dict) plt.figure(figsize=(12,9)) plt.title("Keywords:[{}] Location:[{}] {}".format(search_keyword,location, current_datetime)) plt.imshow(w) plt.axis("off") plt.show()
A picture is worth a thousand words, let's run the program and see what we get. We are going to search "programmer" job in "California" using 10 result pages.
$pythonw indeedminer.py "programmer" "California" 10And here we go:

We can find some important wordings there like "C", "Java", "php", "database", etc. Job seekers looking for "programmer" job in "California" should pay more attention on those words.
The program is about 100 lines of code. It can provide you a taste combined with Beautiful Soup, TFIDF and Word Cloud. And of course, it also provides you a visualized way on the current job market trend.
What have we learnt in this post?
- Usage of Beautiful Soup on scraping Indeed.com
- Usage of TFIDF to get weighted words
- Generation of word cloud to visual our findings
(the complete source can be found at https://github.com/codeastar/webminer_indeed or https://gitlab.com/codeastar/webminer_indeed)